 Originally developed to be used in the Korean war, thermal imaging camera has found its way into other spheres of life.
Thermal imaging technology is widely used by firefighters to find people and hot zones in the event of a fire, by law enforcement agencies for surveillance in addition to search and rescue operations, and basically in any field where heat detection is helpful to accomplish the goals.
This article is focused on the best thermal imaging camera for home inspection and building diagnosis, as well as the uses of thermal imaging technology in this sector.
Benefits of Infrared Thermal Imaging In Home Inspection
When objects get hot they emit radiation, infra-red radiation. Thermal imaging cameras have the ability to “see” this radiation, thus objects can be detected in the dark solely based on the amount of heat they emit. The thermal imaging cameras sense the radiation, form a picture and present it on screen. Pretty cool stuff!
The use of thermal imaging camera in construction, building diagnostic, energy audit, house inspection and property pre-purchase check is fast gaining popularity over the years –
because this non-invasive technology can really help to ensure proper installation of electrical wiring and tooling to prevent human injury and asset damage, while achieve energy saving and cost reduction that make the thermal camera pay by itself!
Watch the brief video below for overview of infrared thermal imaging technology, and how it helps home inspector to surface hidden issues in residential properties and real estate that cannot be seen with naked eyes.
As shown, this advanced IR technology can be used for electrical inspections, HVAC, roofing, along with detection of leak, insulation issue, moisture, mold, heat loss, and much more.
>> Learn More about the Benefits and Extensive Applications of Thermal Imaging Camera for Home Inspection in this Comprehensive Guide with Videos and Case Studies
Choosing Thermal Camera: Top 3 Factors To Consider
When it comes to choosing an infrared thermal imaging camera to inspect a house or building, here are top 3 key factors you should consider:
1. Thermal Sensor Resolution that determines the clarity and fine details of a thermal image. Higher resolution means it contains a larger number of pixels per unit of area, and more pixels will present clearer and better image quality, particularly for small objects.
Hear out what Certified thermographer Devin Flynn says in the video footage below.
2. Cost: Everyone has different budget on how much to spend on a thermal camera, so assess the price versus your actual needs. For example, a house owner who likes DIY home inspection may not want to spend over $1000 for a high resolution professional thermal cam.
3. Battery Life: This is depending on your application and usage. If you are planning to get a thermal camera for work or frequent use, then you should avoid choosing thermal camera with short one hour battery life that will interrupt you.
Other than that, nearly all thermal imaging cameras on the market today has >= 9 Hz refresh rate (means it creates/refreshes image at a rate of >= 9 times per second) and the necessary temperature range up to max +300°F that is adequate for home inspection purpose.
5 Best Thermal Camera for Home / Building Inspection
Let’s start by looking at the professional thermal imaging cameras used by building inspector and home inspection service provider, and then we’ll also cover the more budget friendly options for those who want to perform DIY home inspection without burning a hole in pocket.
#1: Best Professional – FLIR E8 Compact Thermal Camera
FLIR E8 has 2 built-in cameras:

A 3.1 megapixel visible light digital camera that captures digital photo, and an infrared camera which captures a thermal image.
This thermal imaging camera utilizes the proprietary MSX (Multi-Spectral Dynamic Imaging) technology to superimpose thermal images over the digital photo to generate detailed images, thus makes it a powerful equipment for building inspections.
You only need to point this handheld thermal camera on the targeted object and then press the button. It simply uses the point-and-shoot style.
With its high Infrared sensor resolution at 76,800 (320 x 240) pixel and the MSX enhancements, you can use FLIR E8 with 3 inch 320 × 240 colour LCD display to locate structural issues and hidden problems quickly, observe accurate temperature readings, and even identify whether or not repairs were done correctly on various building structures.
Flir E8 has ±2°C / ±2% accuracy and high thermal sensitivity at <0.06°C. It provides several colour pallets (rainbow, iron, black & white) which you can select from to customize your view with user-friendly interface that makes your operation easy.
This E8 has new FLIR’s feature, the adjustable level and span which allows you to thermally tune your images. You can optimize the temperature range for the desired target, thus allowing the user to see very small temperature differences.
The video below shows FLIR E-series thermal cam overview, starting from base model E4; E8 model has the highest thermal IR resolution among FLIR Ex-series thermal camera.
Of course, if you have the budget and want to get the very best professional thermal imaging camera for industrial building diagnosis and plant maintenance, then you can even consider the top-notch FLIR E60bx as upgrade.
Flir E8 is lightweight and built with an ergonomic handle and a durable housing that is resistant to water and can withstand a drop from 6.6 inches.
It uses a rechargeable lithium-Ion battery which can last for 4 hours. You can easily remove the battery and replace it with another that is fully charged.
You can save the data on internal memory or stream it through the built-in Wi-Fi to mobile devices using FLIR mobile app. The digital photos and crisp thermal images are stored together for easy reporting.
>> Check out the user reviews and latest price >> here
If FLIR E8 is not within your budget, then you can consider the next in this list.
#2: Fluke TIS20 Thermal Infrared Camera
This Fluke thermal imaging device possesses infrared camera with 120 x 90 (10,800 pixels) resolution.

Fluke utilizes its unique IR-Fusion technology that combines both infrared thermal image and visible light digital photo in one picture of your target object for better clarity.
It does this at different preset levels and add picture-in-picture to achieve pixel-for-pixel alignment of infrared and digital images, in order to generate a detailed and clear hybrid image.
This helps to easily identify various problems before they develop into complex failures that require expensive repairs.
Fluke TIS20 features a 3.5 inch, 320 x 240 LCD display. Built with a rugged design which allows you to use it in any kind of environment, it can measure a temperature range of -20°C to 250°C (-4°F to 482°F).
This Fluke thermal imaging camera can be connected to a smartphone via Wi-Fi, and its Fluke Connect SmartView software allows you to share the data and images captured in real time across your colleagues which thus saves you time by creating and emailing reports from the operation site. This can help to speed up the rectification of problem detected during a thermal inspection.
You can also utilize Fluke Connect to perform analysis on the captured images from TiS20 with graphical tools that help in quantifying the extent of the problems, while users also have the convenience to take multiple measurements and save them to the cloud via Wi-Fi upload.
Upon completion of analysis, you can easily create a professional report that includes all the thermal images and an easy to follow report wizard that guides you in every step.
Watch the following video to understand more about TIS20 and Fluke Connect.
Fluke TIS20 is powered by a lithium ion smart battery which displays its level of power on the LED display. It offers three colour pallets that allow you to customize your view.
The device also allows you to store thousands of images given its huge internal storage of 4GB and an additional 4GB with an optional micro SD card.
Compared to Flir E8 with pro-level IR thermal sensor resolution of 320×240 (76,800 pixels) –
Fluke TIS20 thermal camera with 120 x 90 (10,800 pixels) resolution is relatively a more affordable option for building inspector and home inspection service provider.
You can check out the price and user reviews of Fluke TIS20 via the link/button below.
PLAN - PRICE
Description

FLIR E8
Thermal Camera
320x240 Sensor (76,800 pixel)
3-inch 320x240 LCD
Flir MSX technology
–20 to +250°C (–4 to +482°F)
<0.06°C thermal Sensitivity
±2°C thermal Accuracy
Wi-Fi Enabled
4 Hours Battery life
FLUKE TIS20
Thermal Camera
120x90 Sensor (10,800 pixel)
3.5-inch 320x240 LCD
Fluke IR-Fusion technology
-20 to +350°C (-4 to to 662°F)
<0.10°C thermal Sensitivity
±2°C thermal Accuracy
Wi-Fi Enabled
4 Hours Battery life
FLIR C2
Thermal Camera
80x60 Sensor (4,800 pixel)
3" 320x240 LCD Touchscreen
Flir MSX technology
–10 to +150°C (14 to 302°F)
<0.10°C thermal Sensitivity
±2°C thermal Accuracy
Not Wi-Fi enabled
2 Hours Battery life
#3: Best Value – FLIR C2 Compact Thermal Imaging System
FLIR C2 is in a ‘sweet spot’ between professionals and DIYers who want to buy a thermal imaging camera for work or personal use —
Not only due to its price point that fits into most people’s budget, but also because FLIR C2 Compact Thermal Imaging System is a full featured, pocket-sized thermal camera with significant values that can help to uncover hidden heat patterns.
FLIR C2 is an intuitive user friendly device and does not need proper training to use it, and anyone from any age group can learn to use it. It is really light, has a slim profile with dimensions being 125 × 80 × 24 mm and weighing only 0.13 kg (0.29 lb).
C2 has two built in cameras. An 80×60 infrared thermal sensor and a visible light camera.

The combination of these two cameras produces an excellent thermal image with plenty of detail using MSX enhancement, so we know exactly what we are looking at, instead of just a visible spectrum of heat that does not give clear images. The camera due to its MSX technology results in undiluted thermal pictures.
This FLIR thermal camera also has a spotlight, a spotmeter and emissivity measurement options. Hundreds of images can be captured in C2’s internal memory. The images can be viewed from the gallery via its 3 inch color LCD with 320×240 pixels resolution, or saved in a computer using the USB cable that comes with the camera.
FLIR C2 features a touch screen, and very few thermal imaging devices on the market today come with a touch screen display. It also has auto rotation feature to view images in portrait or landscape view however the user likes, and a 45° Field of view that makes it easier to frame scenes the way you need them for inspection.
FLIR C2 is a great tool that is a building professional can get excited about. Any home inspector would love to have this device in his pocket. It can easily detect problems like hidden insulation problems, electric short circuits, signs of moisture etc. It is an affordable solution to detect everyday problems where as, other thermal imaging devices used to cost more than a thousand dollars.
The images from the C2 are saved as a radiometric JPG and each image is 4800 pixels in size. All the temperature data is stored in the image and the temperature of every pixel remains measurable whenever you want to measure it using the FLIR Tool software.
Watch the following video to take a glance on the features of FLIR C2 thermal camera.
The operating time of the device is 2 hours and the camera can be charged with the USB cable. It takes approximately 1.5 hours to charge it completely. The device shuts down automatically after a few minutes of not being used.
To turn it on, the button on top left is pushed and the display is turned on to make us see what we can’t see with a naked eye. The power button is designed for fast access. To get to the camera settings the touch screen is just tapped and it opens up the interface. It can let you view images with and without MSX.
Similarly the spotmeter can also be turned on or off according to the need. Different color palettes like Iron, Rainbow, Rainbow HC and Gray are also available in C2. FLIR C2 lets us measure emissivity as well. FLIR C2 also has a spotlight which can be used as a flashlight so it only comes on when a picture is needed to be saved. FLIR C2 has a large, simple image save button that saves thermal, visible and MSX image all at once.
FLIR Tool software is a professional software to create reports using the images captured by the camera, the software is compatible with MAC or Windows. FLIR tool software is a free software that can be downloaded from the FLIR website. Images can be opened in the software, while contrast and other settings can be adjusted in the software. It lets you isolate temperature measurements on any pixel and can help you create inspection reports.
The standard FLIR C2 thermal camera does not have Wifi feature, however you can choose the next ‘near-identical’ newer model called FLIR C3 which is Wifi-enabled – if you want to.
The following video compares FLIR C2 vs C3 model, with their differences explained.
FLIR C2 is the best selling thermal imager at Amazon as you can check it out >> here
The purchase of this thermal camera comes with a battery, power supply/charger, a Lanyard, a user guide USB memory stick, and a USB cable.
#4: Best Budget – FLIR TG165 Spot Thermal Imager
Let’s start by making it clear:
Technically speaking, FLIR TG165 is not really a thermal imaging “camera”.
FLIR TG165 is indeed an “Imaging Infrared Thermometer” that combines the feature of a thermal imaging tool and a temperature measurement tool.
The thermal imager in the TG165 gives you the thermal properties of the objects captured by the sensor, whereas the thermometer in it gives the temperature measurement of the objects.
In another word, FLIR TG165 captures the infrared rays emitted from the object that it is focused on, and then presents an image that includes the non-contact temperature reading.
The following video gives excellent explanation on the TG165 hardware design, and how exactly it works as a “Imaging Infrared Thermometer” that gives the similar thermal image display as shown by other traditional thermal imaging cameras.
FLIR TG165 is equipped with a thermal sensor with IR resolution of 80×60 (4,800 pixels). It can measure temperatures ranging from -25 to 380°C with an accuracy of ±1.5% or ±1.5°C.
When the trigger is pulled, laser is thrown to show where the center of the screen is pointing, and the temperature measurement of that exact point is shown. When it is released, an image is taken, and the image can be discarded or saved in the memory card to be used later.
The color palates of its 2-inch LCD display are hot iron, rainbow and grayscale. The screen can display the temperature in Celsius and Fahrenheit scales, with and the user preferred unit can be selected from menu options.
With a rugged construction that can withstand a 2-meter fall, FLIR TG165 Spot Thermal Imager comes with wrist strap lanyard, 8 GB Micro SD card, power supply with separate USB cable, printed documentation.

The 8-GB memory card that comes with the device can store 75000 images even then the memory can be expanded and a 32 GB card can be supported.
TG165 has an internal rechargeable battery with more than 5 hours battery life for continuous scanning. It also comes with a power management option that allows the device to turn off after a few minutes of inactivity.
TG165 Spot Thermal Imager is an affordable thermal imaging solution that can be used in industries and for home inspection, including detection of leakages or missing insulation.
For instance, if you use FLIR TG165 for electrical inspection and point it at an electrical panel, the thermal imager in TG165 will indicate where the hot spots are, whilst its built-in thermometer will indicate the temperature measurement reading of the hot spots and how much they are hotter than the other points on the panel. You can then take off the panel for inspection and investigation.
Indeed, FLIR TG165 has received very positive review rating and user feedback.
You can check out the latest price and user reviews of TG165 via below, and see how it helped successful home inspection.
PLAN - PRICE
Description
FLIR TG165
Spot Thermal Imager
80x60 Thermal Sensor
–25 to +380°C (–13 to +716°F)
±1.5°C / ±1.5% Accuracy
>5 Hours Battery Life
Standalone Handheld
Seek Thermal
Compact Imager
206 x 156 Thermal Sensor
-40 to +330°C (-40F° to 626°F)
Unspecified Thermal Accuracy
1 Hour Battery Life
Mount to iOS/Android Device
FLIR ONE
Thermal Camera
80x60 Thermal Sensor
-20 to 120°C (-4 to 248°F)
±3°C / ±5% Thermal Accuracy
1 Hour Battery Life
Mount to iOS/Android Device
#5: Seek Thermal Compact Imager for iOS and Android
If cost factor is your primary consideration and you do not want to spend over $300 on a thermal imaging camera for house inspection, then Seek Thermal Compact Imager as the least expensive thermal camera is a viable option.
This Seek Thermal imager for iOS and Android has 3 key advantages over its direct competing model Flir One:
Seek Thermal Compact Imager has an impressive thermal sensor with higher resolution at 206 x 156 (32,136 pixels), it has a much wider temperature range at -40°C to max +330°C (-40F° to 626°F), while it is cheaper than Flir One.
However, it’s worth to note that the user reviews and ratings of both Seek Thermal Compact Imager and Flir One are not as good as all the other recommended handheld thermal imaging cameras in this list for various reasons — as you can check out the details via links above.
Designed to be plugged directly into iOS / Android smartphones and tablets, Seek Thermal Compact Imager is lightweight and highly portable.

With your mobile phone is one of the most convenient device that you bring along at most time, Seek Compact allows you to easily take thermal photos and videos by simply powering it up using your Android / iOS smartphone.
If you currently own an iOS / Android device, there is no doubt that Seek Thermal Compact Imager is the cheapest thermal imaging solution for home inspection that you can get.
There are several notes and risks you need to know about Seek Thermal Compact Imager (or Flir One) though, to better align your expectations so that you know what you are getting:
* Compatibility with Your iOS / Android – Hardware and Software
The functionality and overall performance of Seek Thermal Compact Imager fully rely on its integration and compatibility with your iOS / Android smart device hardware and the iOS / Android software from other manufacturers – that Seek Thermal does not have full control.
There have been frustrations and complaints that this thermal compact imager did not work as intended when it was attached to the user’s iOS / Android device, due to overall non-compatibility under varying scenarios, including when there is software version update.
In comparison, other handheld thermal imaging camera is used as a standalone application without such complication and compatibility risk.
* 1 Hour Battery Life and Battery Sharing with Your Phone
Seek Thermal Compact Imager uses your iOS / Android smartphone’s battery to operate.
Some users find this feature is convenient as there is no separate battery charging required, but some users find this is a disadvantage because the Seek thermal imager drains the smartphone’s battery faster.
The Seek Thermal Compact Imager has one hour battery life, which may be too short for professionals and frequent usage.
* Unspecified Temperature Measurement Accuracy
While measurement accuracy is an important performance parameter for any tool with measuring function –
it is surprising to see that the manufacturer does not officially specify the temperature measurement accuracy of Seek Thermal Compact Imager in its product specification, which makes it somehow suspicious and questionable, especially when other handheld thermal imaging cameras clearly specify this in their specifications.
Review Summary: The Verdict
We’ve comprehensively gone through great thermal imagers that can help house / building inspection to achieve energy saving while prevent human injury and asset damage.
Our top recommendations are:
- Best Professional: High resolution FLIR E8 Thermal Imaging Camera with pro-level 320 x 240 (76,800 pixels) thermal infrared sensor.
- Best value: Full featured pocket-sized FLIR C2 Compact Thermal Imaging System with 3 inch color LCD touch screen.
- Best Budget: FLIR TG165 Spot Thermal Imager, an imaging infrared thermometer with very positive user reviews.
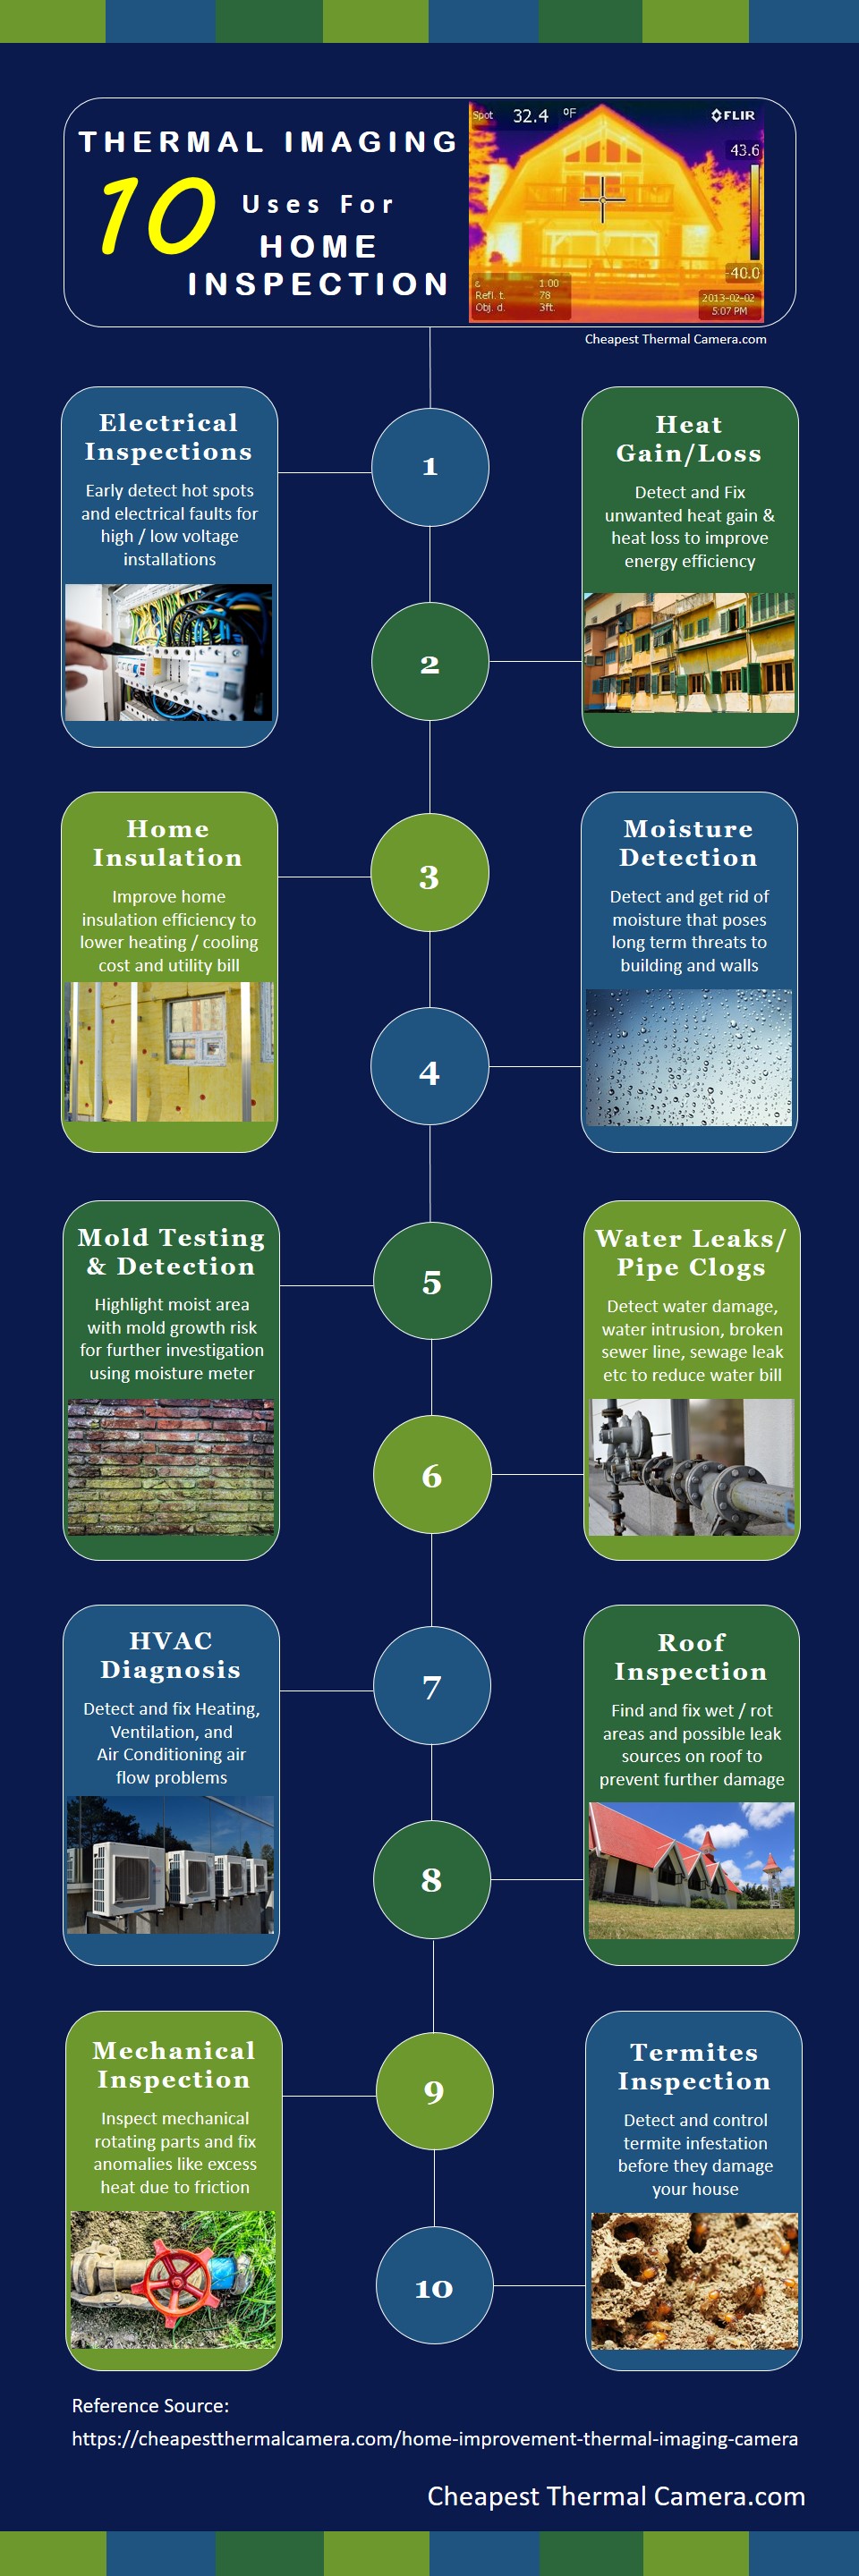
It’s your decision to select a good option that best fit your needs and budget, with below shows the top 10 ways you can use the thermal imaging camera for your home inspection.
Is the infographic useful? If so, please share it.
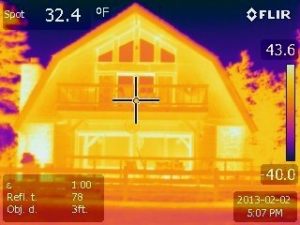
(Thermal house image source: Adapted copy from Wikimedia.
Featured picture credit attribution: Black Hills Professional Home Inspections LLC, Black Hills Thermal Imaging located in Rapid City, South Dakota. 605-209-6766)